1) DOWNLOAD AND INSTALL
Simutrans is of course free to download, from www.simutrans.com/download.
An installation of Simutrans has two major components - the engine and a pakset:
For you Windows users, a handy installer is available from the download site to help you install all the right files in one go.
An installation of Simutrans has two major components - the engine and a pakset:
- The Simutrans engine: this is the core component of Simutrans that makes the game run.
- A pakset: this is a collection of graphics files and other bits and pieces that is needed by the engine (think of a Minecraft resource pack). Different paksets have different graphics, such as different countries or different resolutions. Pak64 is the official Simutrans pakset. It's well supported and developed and is Simutrans' historical pakset. However you may prefer something larger and higher resolution, especially if you have a big screen: pak128 is open-source and also well developed, or even pak192.
For you Windows users, a handy installer is available from the download site to help you install all the right files in one go.
2) LET'S START

When you run Simutrans, you'll be presented with the menu, overlaying a small ready-generated Simutrans game. If you want a challenge, the game is actually playable, but for now we'll make a new game for this tutorial.
- New Game: click this to start the menu that will generate a new map (think of the SimCity world creator at the beginning of a game).
- Load Game: load a saved game.
- Play Online: set up a multiplayer game. We'll deal with this later.
- Load Scenario: load a save game that has additional scripting to tell a story, set rules etc.
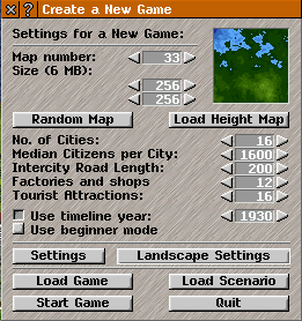
Once in the New Game menu, you can change various landscape, city and game options:
- Map number: like a random map seed. The random map button cycles through the seeds. Different maps give different arrangements of cities - e.g. small lonely island towns, large prairie metropolises... you get the idea.
- Map Size: The number of tiles up and down the map. Go easy if you don't exactly have a super computer: the bigger the map, the higher the CPU load. Also, the size value in MB shows how much RAM your map will need.
- Number of Cities and Median Citizens per City: cities are generated in Simutrans in various forms (villages, cities...). Therefore, the city size value gives a median - you may need to experiment to see what you like. The city number can give seriously long loading times if you set this value too high.
- Intercity Road Length: changes how many roads will be pre-generated between cities. This too can give serious loading times if you set this value too high.
- Factories, shops, tourist attractions: this value changes how many important buildings the generator will try to make appear on the map.
- Beginner mode: makes things easier, although a lot of packs don't really need this.
TIMELINE SETTINGS: Simutrans works on a historical timeline: you'll be able to buy vehicles and buildings appropriate to the part of history you're currently playing in. Sometimes old vehicles will be retired and no longer available to buy new, sometimes new vehicles and technology will become available. If you uncheck the Use Timeline box, all vehicles and roads/tracks/runways/industries will be available. (Ever wanted to transport passengers with Concord and hackney cabs simultaneously? Now's your chance!)
SETTINGS AND LANDSCAPE SETTINGS: Settings takes you to a menu that allows you to fine-tune many of the Simutrans engine's mechanics (including selecting left/right-hand-drive, although this can mess up signals and road signs). Landscape settings allows you to change how the different world biomes appear, and how many rivers, lakes and mountains will be generated. The values for the different biomes dictates what height the particular biomes will appear up to (setting a biome to 0 stops it appearing on your map).
SCENARIOS: Want to play with some goals? Scenarios are scripted games that give you specific targets to meet. More can be downloaded off the internet.
>>> When you're ready to play, click Start Game!
3) RECONNAISSANCE
Simutrans will generate a world, then you're ready to start exploring for a good place to start making your transport company!
Let's start by learning to move around. Here's some basic view controls that you'll need to build and view the world:
RIGHT-CLICK-AND-HOLD AND DRAG: Move the game view around.
PAGE-UP/DOWN: Zoom in and out.
Shift-R: rotate the game view.
a: Inspect tool. Used for everything but building.
" (double quote mark): cycles through transparent building and industry modes. Useful for seeing behind things in city centres.
% (percent): toggles tree transparency. Never get lost in the woods again!
( and ) : eye candy time! Changes the ambient light level to make it night-time. Can actually be useful sometimes in making a scene a bit easier to see. (This may be bound to - and + in other paks.)
FIRST STEPS
Once you've got the hang of moving around, it's time to look for a good place to start building. The following bullet points should give you an idea of what the game is all about:
- The aim is to earn money by getting passengers and goods from A to B. Each unit of goods/passengers has a specific destination - if it cannot get there on your network, it won't! Money is earned by number of units of delivered and how fast the goods got there.
- Goods are used in factory chains. There are many different chains in Simutrans paks; a simple pak64 example is shown in the following picture:
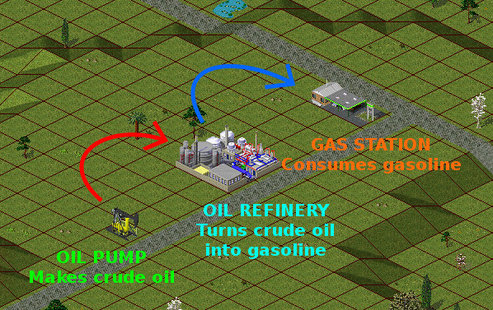
- Each factory connects to another, specific, factory. In the above example, there may be many oil pumps on the map, however only a few may be able to give crude oil to the refinery in the picture. Making a transport link between the pump and a factory it's not connected to will result in no transfer of goods and a large hunk of costly infrastructure doing NOTHING. ;D
Let's find a good industry to link together. Passenger routes are fun, but expensive to set up and run for the first period of time, so getting a decent industrial income first is a good idea.
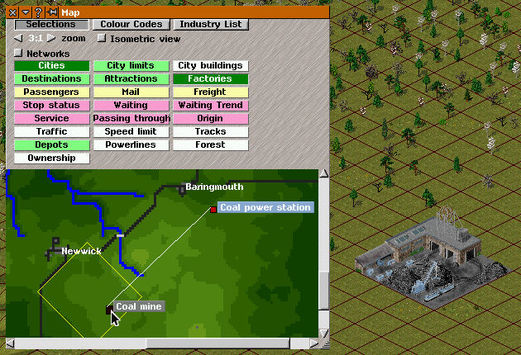
>>> Press m to bring up the map, then the press the "Selections" button to show the different map layers. Turn on the "Factories" layer. This will highlight industries on the map, and allow you to see which other industries they supply by hovering your mouse over their squares. (Hovering over with the Shift key will show which industries supply the one your mouse is over.)
The image shows a good starting chain to run. Coal and oil power station chains are simple, and use goods that give good revenues despite low speeds. (If your map doesn't have a coal power station, generate another one by clicking on the Floppy Disk option menu button, then New Game.)
The image shows a good starting chain to run. Coal and oil power station chains are simple, and use goods that give good revenues despite low speeds. (If your map doesn't have a coal power station, generate another one by clicking on the Floppy Disk option menu button, then New Game.)
4) MY FIRST TRAINTRACK!
Once you've found your coal chain, it's time to shift some coal!
We'll do this by rail, as, assuming you selected the default starting year of 1930, there isn't really any other way of shifting bulk goods.
>> Open the Railroad Tools menu using the buttons at the top of the screen.
>> Select the cheapest rail tool. Hovering over the different ways available shows how much they cost, and how much their monthly maintenance is. As price increases, so does the maximim speed that vehicles using it may get up to. Building a load of expensive fast infrastructure is rather pointless if all you're going to use it for is crawling goods trains.
>> Left-click-and-drag on the game screen to draw a straight piece of track. If the track has bends put into it automatically as you draw it, press and hold Ctrl to try to force out the extra bends.
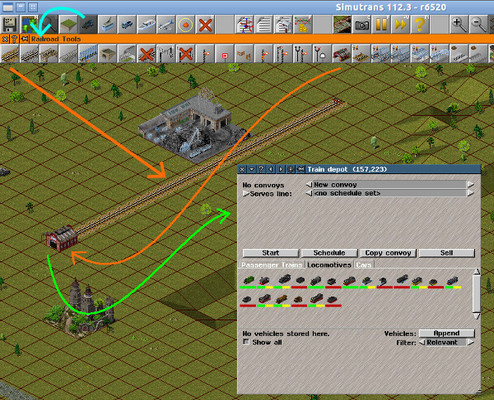
>> Find a "train depot" in the Railroad Tools menu, select it by clicking on it, and build it on the end of the track you built by clicking on the last tile of the track.
We'll do this by rail, as, assuming you selected the default starting year of 1930, there isn't really any other way of shifting bulk goods.
>> Open the Railroad Tools menu using the buttons at the top of the screen.
>> Select the cheapest rail tool. Hovering over the different ways available shows how much they cost, and how much their monthly maintenance is. As price increases, so does the maximim speed that vehicles using it may get up to. Building a load of expensive fast infrastructure is rather pointless if all you're going to use it for is crawling goods trains.
>> Left-click-and-drag on the game screen to draw a straight piece of track. If the track has bends put into it automatically as you draw it, press and hold Ctrl to try to force out the extra bends.
>> Find a "train depot" in the Railroad Tools menu, select it by clicking on it, and build it on the end of the track you built by clicking on the last tile of the track.
You now have some basic railway infrastructure. Congrats! Now we need an actual train. You may think that it would be a good idea to finish building the railway first - however, there are some things we need to learn about our prospective train first:
>> Click on the depot with the inspect tool (using the "a" key), to bring up that depot's menu. Here we will first buy an engine in the "Locomotives" tab.
>> Red vehicles are tenders, or cab-less vehicles that can only be attached behind something else. Click on the front end of the Garratt locomotive, and an entire Garatt unit will be bought. Looking at the stats for each loco, you can see that the Garratt is big, slow, expensive (both to buy and in credits per tile it drives over), yet very powerful. It also doesn't get retired until 40 years time! This makes it a good choice for your coal power station chain.
>> We now need some actual wagons to carry the coal. Click on the "Cars" tab. Hover over each of the available wagons, and notice the "Capacity" statistic showing what type of good the wagon carries. You probably worked out coal was a "Bulk Goods", however you can find what type of good a factory makes by clicking on it with the inspect tool - under the "Production" statistic you'll see the name of goods as well as its type.
>> Keep buying Bulk Goods wagons with the latest intro date (the newest vehicles tend to be the best). You'll notice them added to the train (or "convoy" in Simutrans-speak). As you go, notice how two numbers in the menu will change:
So we now have a train ready to go, of length 10 tiles. Let's do some track building and get those industries connected!
>> Click on the depot with the inspect tool (using the "a" key), to bring up that depot's menu. Here we will first buy an engine in the "Locomotives" tab.
>> Red vehicles are tenders, or cab-less vehicles that can only be attached behind something else. Click on the front end of the Garratt locomotive, and an entire Garatt unit will be bought. Looking at the stats for each loco, you can see that the Garratt is big, slow, expensive (both to buy and in credits per tile it drives over), yet very powerful. It also doesn't get retired until 40 years time! This makes it a good choice for your coal power station chain.
>> We now need some actual wagons to carry the coal. Click on the "Cars" tab. Hover over each of the available wagons, and notice the "Capacity" statistic showing what type of good the wagon carries. You probably worked out coal was a "Bulk Goods", however you can find what type of good a factory makes by clicking on it with the inspect tool - under the "Production" statistic you'll see the name of goods as well as its type.
>> Keep buying Bulk Goods wagons with the latest intro date (the newest vehicles tend to be the best). You'll notice them added to the train (or "convoy" in Simutrans-speak). As you go, notice how two numbers in the menu will change:
- Max Speed: As you add cars, this may decrease as the potential train gets heavier. Some speed drop-off is OK, but watch is doesn't get really slow. With the powerful Garratt and small light old hoppers, this shouldn't be a problem right now.
- Station Length: This is how many tiles the train takes up. You'll need to build this many station tiles in a stop for the train to be loaded/unloaded fully. Ten tiles should be a good balance between a heavy train that takes a long time to load and a train that carries enough to make a profit.
So we now have a train ready to go, of length 10 tiles. Let's do some track building and get those industries connected!
5) TO YOUR STATIONS!
|
So, we're now going to lay the cheap wooden rail on sand all the way over to the power station, and then build a station at each industry so that the coal can be loaded and unloaded from the train. Press m for map if you've forgotten where it is!
>> As described above, build track between the coal power station and coal mine. Make sure that the track comes within a few tiles of each industry. >> Look through the railway tools menu. You'll notice that some icons have little logos in the corner. These are station and station extension tiles: 
A passenger station, a goods station, and a mail station extension.
Simutrans stations can handle goods, mail, and/or passengers. For each of these three that you want your station to handle, you'll need at least one station tile that has the right logo on it. There are two kinds of station tile:
STATIONS These are the actual tiles that your convoy will actually stop in, i.e. they're things like platforms, bus stops, docks, piers, airport ramps/aprons etc. that can be placed on ways like roads, tracks, taxiways etc. Remember working out how long your train was? You'll need to put that many station tiles in a straight line on the track. >> Place 10 goods station platforms in a straight line by each of the mine and power station. Notice how, when you build the first tile, a station name pops up. When you click the next tile, it will get assigned to the station directly next to it. You can also click and drag stations along the track if you want. STATION EXTENSIONS These are buildings that are placed next to stations. They can't be placed on tracks. Say you want to give your station the ability to handle both goods and passengers, but you've only built goods station tiles; you can add the passenger capability by popping down a passenger extension tile. (For example, a passenger train doesn't actually need a passenger platform. It just needs a station with at least one passenger tile somewhere!) |
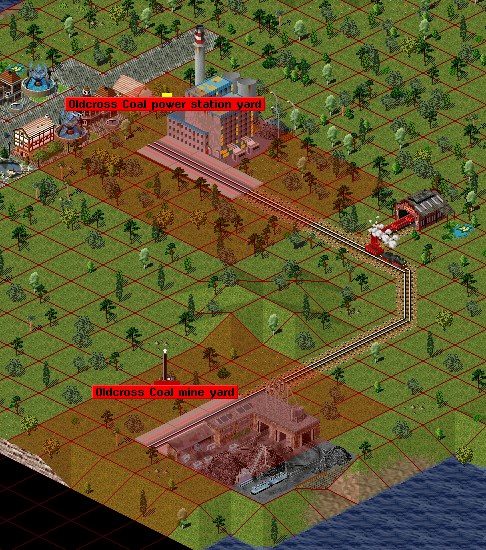
A working Simutrans industry route. Note the vertical black bar indicating coal waiting at the mine, indicating a successfully set up route.
STATION COVERAGE
A very important thing to understand is station coverage. Station tiles can only accept or give out goods/passengers from a limited area around them. You may have noticed a grid appear when you were building the tiles; this was that tile's coverage. >> Press v to see the station coverage. This tints the tiles covered by an already placed station. Make sure that the industries are covered, otherwise the coal won't be able to get to/get off your train! |
And there we are, you've just made a railway line that can transport coal!
All we need to do now is instruct our train where to go, and then the coal mine will give us some coal:
All we need to do now is instruct our train where to go, and then the coal mine will give us some coal:
6) ROUTE-MASTER
>> Find your train again by clicking on the engine shed with the inspect tool. Then click the Schedule button. This menu allows you to give the convoy an ordered to-do list (called a SCHEDULE) of places to go.
>> Notice your cursor has changed. Click first on the coal mine's station, then the power station's station, and these stations will be added to the line.
By default, a convoy will go to an entry in its line, stop, pick up anything it can there, then carry on. This isn't a great system for a goods line; you need your train to be completely full to be most profitable, and the mine probably can't keep up if the train is constantly on the move. You need to make it wait till it's full:
>> Click on the coal mine's station's entry in the line, then click the arrows by Minimum Load to change the minimum load to 100%. The train will now sit in the coal mine yard, waiting full a full load of coal before setting off.
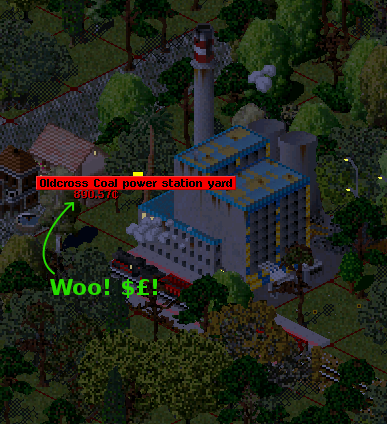
>> Close the schedule menu, then click the Start button. The train should leave the shed and head to the mine. Well done! Use the inspect tool on the train to see how fast it's going, and how much profit :) / loss :( it's making.
>> Notice your cursor has changed. Click first on the coal mine's station, then the power station's station, and these stations will be added to the line.
By default, a convoy will go to an entry in its line, stop, pick up anything it can there, then carry on. This isn't a great system for a goods line; you need your train to be completely full to be most profitable, and the mine probably can't keep up if the train is constantly on the move. You need to make it wait till it's full:
>> Click on the coal mine's station's entry in the line, then click the arrows by Minimum Load to change the minimum load to 100%. The train will now sit in the coal mine yard, waiting full a full load of coal before setting off.
>> Close the schedule menu, then click the Start button. The train should leave the shed and head to the mine. Well done! Use the inspect tool on the train to see how fast it's going, and how much profit :) / loss :( it's making.
And there you have a simple goods route!
There are many other important things to know about in Simutrans, but what you've just done should get you quite far.
There are many other important things to know about in Simutrans, but what you've just done should get you quite far.
